SB20 - Flywheel Axle and Cog Bearing Service
Can You Service Sealed Bearings?
Sealed bearings, like those in the SB20 flywheel, can be serviced to extend their lifespan. You can often reduce the rumbling sounds and vibrations that occur after several years of use.

⚠️ The Flywheel Bearings have metal dust seals that are not easily removed. I offer partial servicing and replacement options in SB20 - Advanced Flywheel Servicing.
What about Clicking Sounds?
"Clicking sounds" are a common issue with the SB20 flywheel. This happens when the outer ring of a bearing moves side-to-side.
🔬 Stages issued a service bulletin to address the issue: Flywheel Bearing PTFE Application. It tells you to spray lubricant into one bearing on each side of the flywheel.
I must admit, I am not a fan of this method. Spraying light lubricant is a half-measure. PTFE spray can dilute the grease inside bearings. While it can temporarily reduce clicking noises, PTFE spray can negatively affect bearing durability.
Greasing and re-seating the Axle and Cog Bearings, as shown here, is often a better alternative.
Video
Who Should Do this Service?
2. If you have grinding, clicking and thudding sounds that indicate bearing failure. All SB20 flywheel bearings are inexpensive. The service procedure shown can also be used to replace bearings.
3. You read the Stages service bulletin on quieting clicking flywheel noises, and want to do a better job.
Difficulty Level
Servicing the Axle and Cog bearings, require moderate DIY skills. I rate the difficulty to be 7 out of 10.

For context: Belt tensioning and alignment is a 5 out of 10. Servicing the flywheel bearings (the subject of future blog post) is a 9 out of 10.

For context: Belt tensioning and alignment is a 5 out of 10. Servicing the flywheel bearings (the subject of future blog post) is a 9 out of 10.
Servicing Details

Bearing Service Steps
Servicing Axle and Cog Bearings requires the following steps:
- Remove plastic covers.
- Remove drive belt, axle bolts and tensioners.
- Remove lower PCB and brake stay.
- Slide out flywheel.
- Disassemble axle and cogs, add grease to bearings, re-assemble axle and cogs.
- Slide in flywheel.
- Replace tensioners, brake stay and lower PCB
- Replace belt. Check tension and alignment. Tighten bolts
- Replace plastic covers.
Remove Plastic Covers

- Start on the non-drive side. Remove both flywheel covers. All use 3 mm hex bolts.
- Move to the drive side. Remove the front and side covers. Once again, 3 mm hex bolts.
- Side cover tip: Position cranks at 7 o'clock. Pull the cover down and to the left, to remove.
- 🎬 See the video for more details.
Remove Belt and Flywheel Fasteners

- ⚠️ Loosen the Vertical 6mm Bolt behind the non-drive Axle Bolt.
- Loosen both 14 mm non-drive Axle Bolts.
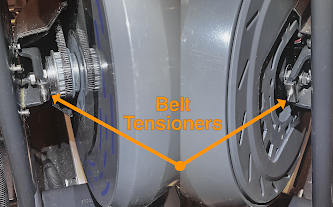
- Remove Tensioners.
Remove Lower PCB

- Remove connectors from Lower PCB.
- Remove Lower PCB.
- Remove Flywheel Brake Stay.

An alternative approach
I used a small 2 x 6 support board with notches that fit over the hex bolts on the SB20's front feet. These bolts are spaced 6 inches apart. They help hold the support board in place, as you tilt it fore and aft.

Roll up a medium sized towel so it fits snuggly under the Flywheel. You can tilt the board backwards to get a better fit. Check from the front to ensure the towel is centred.
Slide Out Flywheel

Remove Drive Cogs


- Remove Flange and Lock Nuts.
- Remove Retainer Clip.
- Lift Cog assembly to remove.

In this case, you should hold the non-drive-side 19 mm Flange Nut with a wrench/socket while you unscrew the drive-side 19 mm Flange Nut. My next blog post proposes a solution to this problem.
Service Drive Cog Bearings

- Service outer Cog Bearing first. Lift dust seal with utility knife
- Add NLGI 2 bearing grease.
- Replace dust seal.
- Repeat these steps on inner Cog Bearing.
Remove Axle and Axle Bearings


- (non-drive-side) Insert Freewheel Tool (Park FR-1) and unscrew splined Cap Nut.
- Tap drive-side Axle from to extract.
- Use Axle and Lock Nut to push out drive-side Axle Bearing.
Service Axle Bearings

- Lift dust seal on drive-side Axle Bearing with utility knife
- Add NLGI 2 bearing grease.
- Replace dust seal.
- Repeat these steps on non-drive-side Axle Bearing (while still attached to axle).
- Stages suggests adding Loctite to prevent clicking and squeaking. You should clean the outer ring of both bearings with isopropyl alcohol, apply Loctite adhesive and then wait 24 hours prior to use.
Re-Assemble Flywheel

- Replace drive-side Axle Bearing.
- Insert Axle from non-drive side
- Replace and tighten non-drive-side Flange and Lock Nuts
- Replace and tighten Cap Nut
- Replace Retainer Clip
- Replace and tighten drive-side Flange and Lock Nuts

In this case, you should hold the non-drive-side 19 mm Flange Nut with a wrench/socket while you tighten the drive-side 19 mm Flange Nut.
I writing a new blog post that proposes a solution to this problem. Stay tuned.
Re-Install Flywheel

- Reposition the towel + board support.
- Slide in Flywheel.
- Replace Tensioners.
- Replace Drive Belt
- 🔬 Before tightening axle bolts, see my blog post on drive belt tensioning and alignment:
Stages SB20 - Drive Belt Adjustments (2025)
- Tighten 14 mm Axle Bolts.
- Tighten the vertical 6mm bolt behind the non-drive Axle Bolt.
Replace the Covers

- Non-drive-side: Replace both flywheel covers.
- Drive-side: Replace drive-side main and front covers.
Cleaning Up
References
The 6910Z bearings in the rotating flywheel shell have permanent metal dust seals that are not easily removed. I will cover how to do partial servicing in an upcoming blog post.
_________________
Replacement Bearing Numbers
Axle Bearings: 6000 2RS bearing
Cog Bearings: 6807 2RS bearing
Flywheel Bearings: 6910Z bearing
Stages Service Documents
TSB-02202025 – SB20 Flywheel Repair Kit


Comments
Post a Comment