Stages SB20 - Drive Belt Adjustments (2025)
STAGES SB20 DRIVE BELT ADJUSTMENT (2025 Update)

I adjust my SB20 drive belt once a year to keep things running smoothly. I wish this process was easier. With practice, you can complete all adjustments in less than 30 minutes.
TWO GOALS
Adjusting the drive belt accomplishes a couple of things:
- Gets belt tension right. Optimal tension means quieter running and no slipping during hard efforts.
- Aligns the belt to ride as much as possible in the centre of the flywheel cogs. This reduces friction and positions the front axle perpendicular to the drive belt.
🎬 VIDEO
The Details
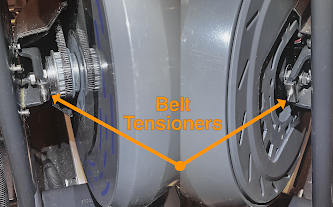
Part Names

BELT ADJUSTMENT SUMMARY

- Loosen the 6 mm vertical bolt. If you forget to loosen it, you can snap the non-drive-side tensioner when making adjustments.
- Loosen both axle nuts so the axle can easily move forward and back. There should be a visible gap between the axle nut and bike frame. If the axle nuts are too tight you can snap the tensioners when making adjustments.
- All tension and alignment changes are guided by the tensioners. In other words, the axle is so loose that belt tension is maintained by the tensioners alone.
- Tighten the tensioners, and belt tension increases. Loosen the tensioners, and belt tension decreases.
- Change the tightness on one tensioner (usually the non-drive-side) and you can move the belt to ultimately centre it on the drive cogs.
- When starting your adjustments, the belt may be very loose. You will need to tighten both tensioners quite a bit to get initial tension in the correct range.
- Fine adjustments and then made by tightening or loosening only the tensioners.
- The axle nuts are finally tightened only after satisfactory tension and alignment has been achieved.
SIMPLIFIED BELT ADJUSTMENT
🔈 2025 Update - Here is the simplest way I have found to adjust and align the SB20 drive belt.
Remove Plastic Covers (4)

- Start on the non-drive side. Remove both flywheel covers. All use 3 mm hex bolts.
- Move to the drive side. Remove the front and side covers. Once again, 3 mm hex bolts.
- Side cover tip: Position cranks at 7 o'clock. Pull the cover down and to the left, to remove.
- 🎬 See the video for more details.
Loosen Flywheel (one bolt and two nuts)

- ⚠️ Loosen the vertical 6mm bolt behind the non-drive axle bolt.
- Loosen both 14 mm axle bolts. There should be slight gap between the nut and the frame.
What is Correct Belt Tension?

Goal 🎯: You want the belt to deflect about 15 mm (or 0.5 inches) when firmly pushing near the middle of the belt.
☯ Another way to think about belt tension: You can strive for the loosest belt that never slips during your hardest sprints. Some people sprint at 1400-2000 watts. They will need a tighter belt than those of us who max out at 800-900 watts.
Adjusting Belt Tension

Belt tension is adjusted by turning the axle tensioners to move flywheel axle forward and back.
Turn both front-facing 7 mm tensioner nuts clockwise to increase belt tension. Turn both nuts counter-clockwise to reduce belt tension. 
If you loosen either of the tension nuts (with a counter-clockwise turn), you should tap the corresponding axle nut to push the axle backward.
⚠️ Warning: Don't tap the tensioner. It is delicate and can break.
📐 No extra steps are needed when tightening a tension nut (with a clockwise turn). The axle will move forward on its own.
Aligning the Belt
You want to get the belt to ride in the centre of the front cog as much as possible.

- Turn the non-drive side, front-facing tensioner nut (7 mm) clockwise to move the belt to the left.
- Turn it counter clockwise to move the belt to the right.
🎬 Watch the video to see belt alignment in action.
Finishing Up

- Tighten both 14 mm axle bolts. Stages says 30 Nm. For me, this about as hard as I can twist a standard wrench.
- Tighten the vertical 6 mm bolt behind non-drive axle bolt. Torque is 5-10 nm (not very hard).

- Non-drive-side: Replace both flywheel covers.
- Drive-side: Replace drive-side main and front covers.
🏆 That’s it! After following these instructions, your belt will be properly tensioned and aligned.


Thanks for your effort putting together such a great post!
ReplyDeleteI was wondering if you could help me with an issue here. After loosening the bolts I can pretty easy adjust so that I get, what I think, is a good belt tension. It's when I start tightening the bolts the issues starts. The non-drive side is no problem, but as soon as I start to tighten the drive side bolt the flywheel moves forward and tightens the belt tension again. Any hints on how to tighten the bolt and make sure the flywheel doesn't move at the same time. Any tips would be highly appreciated.
Thanks!
Hey Björn. Try this.
Delete1. Get the tension correct with both axle nuts loose.
2. On the non-drive side, loosen the front-facing retaining bolt by a full turn (counter clockwise).
3. Tap non-drive-side axle with a mallet (described in post) to nudge the non-drive axle backward.
4. Tighten non-drive axle nut.
5. Tap drive-side axle with a mallet to make sure it has not moved forward.
6. Tighten drive axle nut.
Keep repeating 1-6 until tension and alignment is correct.
Note about belt alignment: The drive cogs are not manufactured with super-high precision. Alignment can drift to one side after a day or so. This happens on my bike. I just settle with partial alignment but good tension.
Hi Craig, amazing and useful post! I try to align my belt ( 2 month old bike..) because of annoying noise, but unluckly before reading your post :( and did not loose the 14 mm non-drive axle bolt. So I broke the front-facing 7mm. I wrote to stages to get a replacement, but no answer yet. Do you know what can I do or if it can be purchase?
ReplyDeleteHey Manuel. No worries. I broke mine when I forgot to loosen the 6 mm vertical bolt. Here's what I did to fix the broken front-facing bolt and washer assembly.
Delete1. Remove the non-drive washer assembly. That's the washer on the non-drive axle with the bend that holds the (now broken) forward-facing bolt.
2. Use a power drill to drill out the broken bolt stub connected to the washer assembly.
3. Get a suitably sized bolt and nut that fits the drill-out hole. I used either an M3 or M4 bolt with locking nut .
4. Use a hand file to square off the new bolt head to fit the bend in the just-drilled-out washer assembly. This will keep the bolt from turning.
5. Re-install, add the new nut, tighten and enjoy.
Good luck.
My modified part is stronger
Thanks Craig I was figuring out the same solution now I am more confident if you already did it! Stages should hire you!!! ;) thanks again!
ReplyDelete