Indoors and out, my bike position changes a small amount each season.
My road bike tends to define my optimal position at the end of the summer. It includes millimeter adjustments made over the course of several thousand kms. Similarly, my indoor bike defines my optimal position at the end of the winter.
When I have settled on a new optimaI position, I like to transfer it to my other bikes, including: road, gravel, indoor and time-trial.
Transferring Bike Measurements
Assuming you have one bike with your optimal position, you need a method for transferring the riding position to multiple bikes.
Prerequisites and Notes:
Cranks - All bikes have same crank length. Watch for small differences in pedal platform height.
Saddles vary - They can have different lengths and widths. To create a standard measurement position on all saddles, I use the top of the saddle where it touches the pelvic bone. This is near but not exactly the widest point on most saddles. I put a mark on the saddle since this point is used in subsequent measurements.
Handlebars vary - Brake levers will often need to be moved to accommodate different reach and drop radius angles between handlebars. Keep this mind. A solution is provided below.
Here's the method I have used for decades.
1. Seat Height: Measure distance from the centre of the crank axle to top of the saddle at the pelvic bone position.
2. Saddle Setback: Use a vertical level or plumb-bob to measure the horizontal distance from the centre of the crank axle to the pelvic bone position.
3. Handlebar Reach: Measure the distance from the pelvic bone position to the back edge of handlebar tops.
4. Handlebar Drop:Use a horizontal level to measure the vertical distance from top of saddle (at the pelvic bone position) to the top of the handlebars.
5 - 8. On the target bike: Adjust the target bike to reproduce each of the 4 measurements from the reference bike. Be prepared to iterate when you discover you didn't measure everything correctly.
A Better Way
Setting up a new bike requires 8 steps. It can be tedious and error prone. To make bike fit transfers easier, I constructed TheFit Frame. It allows critical measurements to be transferred in one step.
The Fit Frame has adjustable arms that lock the Seat Height, Saddle Setback, Handlebar Reach and Handlebar Drop measurements.
Reproducing bike fit is as simple as moving The Fit Frame to another bike.
Movable bumpers mark the crank axle centre, pelvic bone position, handlebar height and reach along with other critical heights and distances. A pair of spirit levels keep the frame properly aligned on all axes.
This version also has extension arms to measure brake hood position on tricky bikes like my SB20 indoor bike.
Made withfrom a 3D Printer
The Fit Frame is not quite 3D printed. It's made from the aluminum extrusions, gusset plates and hex fasteners used to construct 3D printers 😂.
Plus a table saw to cut everything along with a some patience to figure out how to assemble this kind of frame.
=========== UPDATE 🎉 ===========
Today, I received a new saddle from AliExpress. It is flatter, thinner (with wider nose) and longer than the Stages saddle. I was able to mount and replicate my position versus the original saddle in a few minutes using the The Fit Frame. Adjustments included more setback and slightly lower seat height.
My back and knees said thanks.
Saddle Details: There are two models.
Nylon frame and steel rails 260g I bought this one for indoor riding.
Carbon frame and rails160g (recommended) 25% higher cost. Appears to be more robust. I bought this one for outdoors.
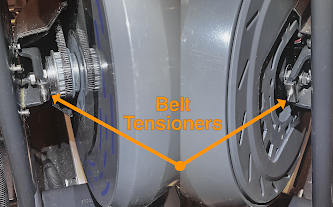
STAGES SB20 DRIVE BELT ADJUSTMENT (2025 Update) I adjust my SB20 drive belt once a year to keep things running smoothly. I wish this process was easier. With practice, you can complete all adjustments in less than 30 minutes. UPDATED: December 2025 - New video and pictures. Simpler procedures. 📐 These instructions augment the Stages support documents: Belt Tension Adjustment (SB20) Flywheel Making Noises . TWO GOALS Adjusting the drive belt accomplishes a couple of things: Gets belt tension right. Optimal tension means quieter running and no slipping during hard efforts. Aligns the belt to ride as much as possible in the centre of the flywheel cogs. This reduces friction and positions the front axle perpendicular to the drive belt. 🎬 VIDEO Here's a new four minute video showing how to adjust tension and align the drive belt. The Details Part Names Here are part names related to drive belt adjustment. BELT ADJUSTMENT SUMMARY “ It’s all about the tensioners ”....
Breaking a Drive Belt Tensioner Adjusting SB20 drive belt tension is something your should consider performing every couple of years. Here's how: Stages SB20 - Drive Belt Adjustments The good news: A properly adjusted belt is quieter and extends the life of the drivetrain. The bad news: The belt tensioners ( one on each axle ) can break if you over tighten them. The tensioner bolt will typically snap next to the washer assembly 😖. DIY Fix Getting SB20 replacement parts is challenging these days. Here's how to fix a broken tensioner. 1. Drill out the broken bolt that is welded to the tensioner ring. 2. Find replacement bolts. I recommend M5 x 1 with thread length of 30 mm. Use stainless steel if possible. If you have a hex cap bolt, you can use it directly. If you have a round head, you will need to file one edge. You will also need matching lock nuts. You can also use SAE bolts. A 10-24 or 10-32 bolt with 1-1/4" thread length works well. Here's a ...
Just about everyone who rides indoors will eventually hear clicking or scraping noises. Some noises are inconsequential. Others can represent a serious issue. Let's take a look at some of the most common noise complaints with the Stages SB20 smart bike. Parts Before getting started, here are some key SB20 part names : Flywheel Rubbing against Plastic Cover Manufacturing variances, heat and wear can cause the right plastic cover to make rubbing noises as the flywheel spins. These noises persist after pedalling stops. You can eliminate the problem by trimming the right plastic cover as shown above. Flywheel Cogs Rubbing against Front Cover Fastener Adjusting drive belt tension can move the front axle forward causing it to rub or scrape against the metal fasteners holding the front cover in place. To verify: Remove the front cover. Look at the front cogs. Do they rub against the front cover fasteners when pedalling . Note: Removing the front cover can cause noises to stop. Th...
When your Stages SB20 smart bike is working normally, the built-in power meter cranks provide power and cadence data to apps like Zwift . Behind the scenes, they also provide the data that lets the SB20 regulate resistance when running in Erg mode. Some riders also add 3rd party power meter pedals . They can work very well. It surprises many people that Erg mode requires the built-in Stages power meters even when 3rd party power meters are in use. For more information on SB20 erg mode , see: Erg Mode with a Stages SB20 Smart Bike . Question of the Day 📣 Question: If my Stages crank power meters fail a nd I have another set of 3rd party power meter pedals , can I still use my SB20 bike? The Short Answer: You can still do free rides and races in Zwift and other apps. You will not be able to use Erg mode. ------------------- Urban legend: Erg mode still works with 3rd Party Cranks Some people report that Erg mode still works when they use ...
If you ride indoors long enough, you will run into a situation where your SB20: Won't wirelessly connect to your workout app. Will not shift gears i.e., no resistance or resistance does not change as you shift gears when just start pedalling after powering up. Here are my suggestions to get you back on the virtual road once again. 1. Power Off and On Before Starting: Ensure the power brick is plugged in and the green LED is lit. Double check that the round plug from the power brick to the back of the bike is firmly inserted. Let's start with the simplest solution: Power off/on everything. Unplug your bike. Wait 30 seconds for the power brick to drain and then restart. At the same time, restart your device (iPad, Apple TV, computer or phone) and your app (Zwift, IndieVelo. Rouvy etc.). Try connecting again. Also try using another app, including the Stages Cycling app. Better yet! Add an on off switch to your bike . You will be glad you did. Bonus Suggestions: ...
-- UPDATE August 2025 -- Stages Cycling went bankrupt in June 2024. Giant subsidiary SPIA Cycling , bought selected Stages assets in late 2024. There has been some encouraging news in 2025. It's just not all good. The good news: You can buy replacement parts on the Stages US web site . Stages is providing limited support. They will ship some parts under warranty. Your can send email to support@stagescycling.com or use the US Support Site to open a support ticket. SPIA Cycling indicated that they will be continuing the critical online services needed to keep the Stage Cycling App active for at least one more year. The not so good news: No in-home service is offered . It is DIY "parts only". Stages support people can often describe how to do repair work. Owners outside of the US will likely need to use the US Support Site . Country-specific support appears to have ended as of late 2025. Stages has stopped selling the S...


Comments
Post a Comment