Stages SB20 - Ongoing Maintenance
Stages SB20 - Ongoing Maintenance
Warning: ⚠️ Corrosive Content 😇.
I have read online postings about SB20 rust. I haven’t seen any on my bike but thought it would be good to watch for corrosion as I overhauled my bike in preparation for its 4th winter of indoor riding.
My bike’s warranty expired long ago. I figure I should do some maintenance now since no one else will. Many of these steps should probably be done annually. Looks like every 3 years will have to do for me.
1. REMOVING PLASTIC COVERS

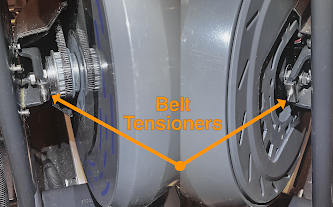
2. BELT ALIGNMENT AND TENSION

Stages describes belt adjustment here: Flywheel Making Noise.
I can add:
a) You should try to get the belt to ride in the centre of the drive ring and front cogs.
b) Correct belt tension is found by trial and error. Too tight and the belt gets noisy. Too loose and the belt can slip during hard sprints. You want something like a 2 cm deflection with firm finger pressure in the middle of the belt (1 cm deflection near the front cogs).
c) You will need to loosen the axle nuts on both sides to fully adjust tension. Remember to loosen the extra 6 mm bolt on the left side to avoid stripping the front locking bolts.
3. CLEANING INSIDE THE COVERS

Aside: I wipe down my bike after most rides. Salt still managed to get inside my SB20. I didn’t find any rust.
4. STRANGE NOISES (AND MORE CORROSION)

Reassembling is just performing the previous steps in reverse. After tightening the hex bolts around the cover, I started hearing a rubbing noise when pedalling. I’ve needed to trim parts of the cover around the flywheel in the past. This one was different. Scraping noises happened only with all bolts tightened - yet no obvious rubbing points were visible. After a while, I found the cause: The newly adjusted front belt pulley was rubbing on the metal fastener that holds the front right axle cover hex bolts. I filed fastener at 45° and all is now good.
2 cm deflection There was salt and minor corrosion on the flywheel around the front pulley. Easily cleaned - but easily missed too 🕵️.
5. PREVENTING FUTURE CORROSION

Seeing how salty liquid collected inside my plastic covers - and images from others who have rust issues - I think sweat is dripping inside along the top edges of both covers. I thought about using weather stripping but settled on latex caulking. I laid down a 2 mm bead along the top edges of both covers and the rubber pad. I used electrical tape on the seam between the covers and added some weather stripping between the cover and flywheel. Aside: The latex caulking will not prevent future maintenance removal but will need to be re-applied. I am continuing to look for a better way to seal the covers.
===== UPDATE November 2023 =====
I made more improvements to deal with sweat infiltration. See Let's Talk About Sweat.


Comments
Post a Comment